SpringBoot Web开发精解
摘要:当在 Spring Boot 中引入 Web 模块时,SpringBoot 会帮我们自动配置 Web 相关的组件,其中 Spring MVC 便是最重要的部分。
分类:Spring Boot
标签:后端, Java, Spring Boot
发布时间:2025-08-14T13:27:44
SpringMVC基础回顾
当在 Spring Boot 中引入 Web 模块时,SpringBoot 会帮我们自动配置 Web 相关的组件,其中 Spring MVC 便是最重要的部分。
组件介绍
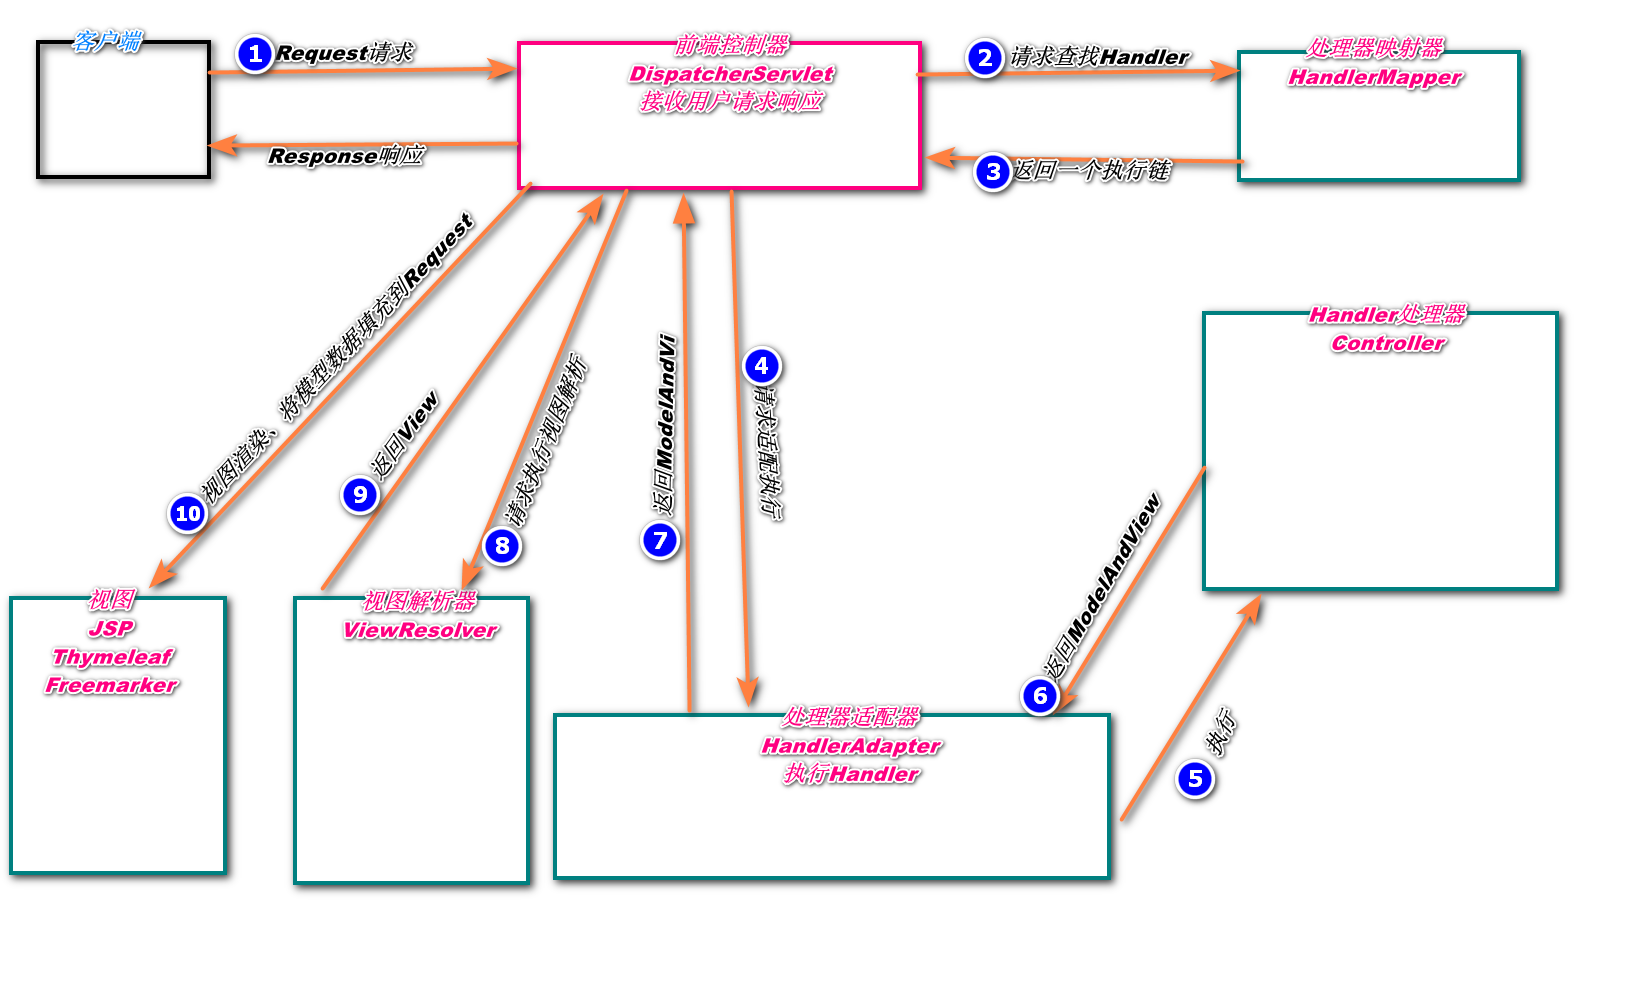
上图是 SpringMVC 的工作原理图。先介绍一下原理图中涉及的各个组件。
- DispatcherServlet:前端控制器,是整个流程的控制中心,由它调用其他组件处理用户请求。
- HandlerMapping:处理器映射器,负责根据用户请求的
URL找到相应的Handler处理器。 - HandlerAdapter:处理器适配器,根据处理器映射器(
HandlerMapping)找到Handler的相关信息,依据持定的规则去执行相关的处理器Handler。 - Handler:处理器,负责执行用户的请求,
Controller便是处理器。 - ViewResolver:视图解析器,**首先根据逻辑视图名解析成物理视图名即具体的页面地址,**再生成
View视图对象,最后对View进行渲染将处理结果通过页面展示给用户。 - ModelAndView:使用
ModelAndView类用来处理该数据的视图。当控制器处理完请求后,通常控制器将会包含视图名称以及一些模型属性的ModelAndView对象返回给DispatcherServlet。
工作流程
介绍完组件的功能后,接着来梳理一下 SpringMVC 工作流程。
- 用户向服务器发送请求至前端控制器
DispatcherServlet。 DispathcherServlet调用HandlerMapping,由此得知由哪个Handler(Controller)来处理该请求。HandlerMapping找到具体的处理器,生成处理器对象及处理器拦截器一并返回给DispathcherServlet。DispathcherServlet调用HandlerAdapter。HandlerAdapter经过适配调用具体的Handler,也叫做控制器(Controller)。Handler处理完请求后返回ModelAndView。HandlerAdapter将后端处理器的结果ModelAndView反馈给DispathcherServlet。DispathcherServlet将ModelAndView传给 视图解析器ViewResolver。ViewResolver根据ModelAndView中的视图名称返回具体的View。DispathcherServlet将ModelAndView中的模型数据填充到视图中,渲染视图。DispathcherServlet将结果响应给用户。
用户向服务器发送请求给前端控制器,前端控制器收到请求之后调用处理映射器得到该请求由那个处理器进行处理,结果反馈给前端控制器,前端控制器再将该结果发给控制适配器,调用具体的处理器处理(
Controller)并返回一个MV,处理器将该MV模型返回给前端控制器,前端控制器得到之后调用视图解析器解析该模型,完了得到一个视图view,再将该视图通过前端页面渲染到浏览器,展现给用户。
Web开发常用注解
在实际的项目开发中,合理的使用注解可以极大的节省时间,提高开发效率,下面介绍一些在
Web开发中常用的注解。
@Componment
这是一个通用注解,用来将任意类标识为Spring组件,被标识的组件会被扫描到IOC容器中。在开发中,我们一般会采用层次结构分明的开发模式,比如SpringMVC模式中,会依据不同的应用场景以及负责的业务属性来将项目使用包的形式划分,每个包下的类一般有对应专门使用的注解去管理。当组件不好归类的时候,就可以直接使用这个注解进行标注,根据使用场景的不同,@Componment注解还衍生出了另外三个子注解,其作用和属性是一模一样的,只是语义上的区别而已。
@Controller:对应SpringMVC控制层,主要用于接收用户请求并调用Service层返回处理并响应数据给前端。@Service:对应于服务层,主要涉及一些具体业务的复杂逻辑处理,期间需要依赖Dao层。@Repository:对应于Dao层,也就是持久层,复杂于数据库的交互相关操作。
@RequestMapping
用来指定请求URL和处理方法之间的关系的一个常用注解。其中的path属性用来指定请求的URL,value是它的别名。method用来指定请求方式,值为GET、POST、PUT、DELETE等等,同样,该注解也是针对不同的请求方式衍生出了几个具体的子注解,参考下表。
| 注解 | 用法 | 等价形式 |
|---|---|---|
| @GetMapping | @GetMapping(“users”) | @RequestMapping(value=“/users”,method=RequestMethod.GET) |
| @PostMapping | @PostMapping(“users”) | @RequestMapping(value=“/users”,method=RequestMethod.POST) |
| @PutMapping | @PutMapping(“/users/{userId}“ | @RequestMapping(value=“/users/{userId}“,method=RequestMethod.PUT) |
| @DeleteMapping | @DeleteMapping(“/users/{userId}”) | @RequestMapping(value=“/users/{userId}“,method=RequestMethod.DELETE) |
@ResponseBody
这个注解的作用主要是将处理器Controller方法的返回值以特定格式写入到Response的body中,再将数据返回给前端。如果是字符串,那么会直接原格式返回,如果需要返回一个对象,会将对象转换为JSON格式之后返回。
@RestController
@Target(ElementType.TYPE)
@Retention(RetentionPolicy.RUNTIME)
@Documented
@Controller
@ResponseBody
public @interface RestController {
   @AliasFor(annotation = Controller.class)
   String value() default "";
}
从上面的源码可以看出,这是一个组合类型的注解。也就是@Controller、@ResponseBody的结合体,某个类或者方法被@RestController注解修饰时,表示该类是一个控制器类,且方法的返回值会写入到Response的body当中,这个注解在 前后端分离的项目开发中很是好用。
@PathVariable和@RequestParam
这是两个比较任意混淆的注解,所以这里将他们放在一起进行对比讲解,方便理解和识记。
根据字母翻译,这里@PathVariable的作用就是获取路径变量的值,而@Requestparam则是用来获取请求参数的。

@PathVariable 获取的是路径中的变量值,也就是?之前的内容。@RequestParam 用来获取查询参数中的值即?之后的内容,同时它也能获取 HTTP 请求体中Content-Type 为 application/x-www-form-urlencoded 编码的内容格式,类似于 id=1&name=ha&age=1 这种格式的数据。
举个栗子:
@RequestMapping("/user/addUser/{id}")
public void addUser(@PathVariable("id") int id, @RequestParam("name") String name){
    //方法逻辑.....
}
假设请求 URL 为 http://localhost:8080/user/addUser/1?name=zhangsan ,那么在 Controller 中获得的数据为 id=1,name=zhangsan 。
@RequestBody
@RequestBody 注解接收的参数来自于 HTTP 报文的 RequestBody 中,即请求体。一般用于处理非 Content-Type: application/x-www-form-urlencoded编码格式的数据,比如:application/json、application/xml 即 JSON、XML 等类型的数据。
更多有关 @RequestBody 和 @RequestParam 的区别可参阅下面来自stackoverflow的回答。
What is difference between @RequestBody and @RequestParam?
RESTful API
在日常的 Web 开发过程中,前后端分离已经逐渐成为趋势。后端人员只需负责业务逻辑的编写以及向前端提供数据的访问接口,而前端人员只需要关注前端页面的编写与数据的渲染工作,大大降低了前后端之间的耦合度。RESTfulAPI 便是目前前后端分离的最佳实践,在传统风格的接口中,请求方法只是使用了 get 或者 post 类型,但在 HTTP 请求方法中,method 存在较多的取值类型例如 put、delete 等。此时可以考虑针对同一个 URL ,采用不同的方法(method),来实现不同的业务操作。简而言之,就是用请求 URL 定位资源,用 HTTP 方法描述操作。
下面我们在 SpringBoot 中实现一个简单的 RESTfulAPI 接口,完成对 User 对象数据的 CRUD 操作,demo项目很简单,没有复杂的业务逻辑,目的在于加深理解。
RESTfulAPI 设计如下:
| URL | 请求方法(相关注解) | 功能说明 |
|---|---|---|
| /users | GET(@GetMapping) | 查询用户列表 |
| /users | POST(@PostMapping) | 添加一个用户 |
| /users/id | GET(@GetMapping) | 根据 id 查询用户信息 |
| /users/id | PUT(@PutMapping) | 根据 id 修改用户信息 |
| /users/id | DELETE(@DeleteMapping) | 根据 id 删除用户 |
使用IDEA创建一个SpringBoot项目,结构如下:
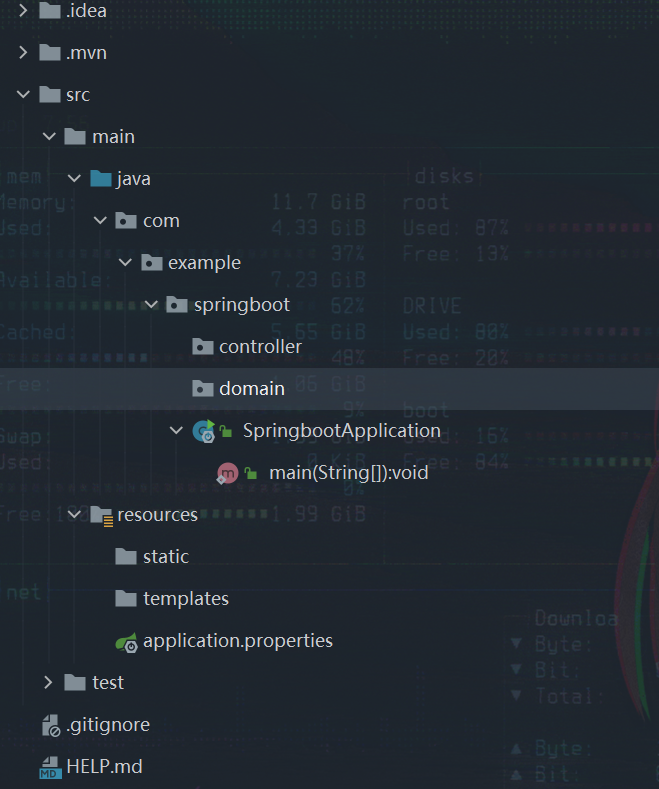
其中 static 文件夹用来存放静态资源,templates 文件夹用来存放模板文件。
打开 pom.xml ,向文件中添加项目依赖。在此项目中,我们添加了一个 Lombok 插件的依赖。简单来说 Lombok 是一个可以通过简单的注解来帮助我们简化冗余代码和样板式代码的插件,例如,当给一个类添加 @Getter 、 @Setter 注解时,在运行时会自动给该类的非静态属性添加 Getter、Setter 方法,不用再像以前一样还要给类的字段添加 getter、setter 方法。当修改类的属性时,也无需再次修改对应属性的 Getter、Setter 方法,在运行时会自动生成相应的方法,编码更加的灵活。Lombok 相关注解的作用可以参阅 Lombok 接口文档。
<?xml version="1.0" encoding="UTF-8"?>
<project xmlns="http://maven.apache.org/POM/4.0.0" xmlns:xsi="http://www.w3.org/2001/XMLSchema-instance"
         xsi:schemaLocation="http://maven.apache.org/POM/4.0.0 https://maven.apache.org/xsd/maven-4.0.0.xsd">
    <modelVersion>4.0.0</modelVersion>
    <parent>
        <groupId>org.springframework.boot</groupId>
        <artifactId>spring-boot-starter-parent</artifactId>
        <version>2.6.6</version>
        <relativePath/> <!-- lookup parent from repository -->
    </parent>
    <groupId>com.example</groupId>
    <artifactId>springboot</artifactId>
    <version>0.0.1-SNAPSHOT</version>
    <name>springboot</name>
    <description>springboot</description>
    <properties>
        <java.version>11</java.version>
    </properties>
    <dependencies>
        <dependency>
            <groupId>org.springframework.boot</groupId>
            <artifactId>spring-boot-starter-web</artifactId>
        </dependency>

        <dependency>
            <groupId>org.springframework.boot</groupId>
            <artifactId>spring-boot-starter-test</artifactId>
            <scope>test</scope>
        </dependency>

        <dependency>
            <groupId>org.projectlombok</groupId>
            <artifactId>lombok</artifactId>
            <optional>true</optional>
        </dependency>
    </dependencies>

    <build>
        <plugins>
            <plugin>
                <groupId>org.springframework.boot</groupId>
                <artifactId>spring-boot-maven-plugin</artifactId>
            </plugin>
        </plugins>
    </build>
</project>
接着,创建一个 User 实体类,包含用户 id、用户名称、用户年龄三个属性。在 src/main/java/com/example/springboot/domain 目录下新建 User.java 文件,文件内容如下。在 User 类上,添加了 Lombok 插件的 @Getter 、@Setter 、@ToString 注解,运行时会自动为类添加 Getter、Setter 、toString 方法。
package com.example.springboot.domain;
import lombok.Getter;
import lombok.Setter;
import lombok.ToString;
/**
 * @author: 八尺妖剑
 * @date: 2022/4/6 17:59
 * @description: User实体
 * @blog:www.waer.ltd
 */
@Getter
@Setter
@ToString
public class User {
    private Integer id;
    private String name;
    private Integer age;
}
在controller目录下新建 UserController.java 文件。为了简化操作,在这里通过创建线程安全的 Map,来模拟数据的存储。
在 UserController 中,我们实现了一个简单的 RESTful API 接口,完成了对 User 数据的 CRUD 操作。
package com.example.springboot.controller;
import com.example.springboot.domain.User;
import org.springframework.stereotype.Controller;
import org.springframework.web.bind.annotation.*;
import java.util.concurrent.ConcurrentHashMap;
/**
* @author: 八尺妖剑
* @date: 2022/4/6 18:03
* @description: UserController
* @blog:www.waer.ltd
*/
@SuppressWarnings({"all"})
@RestController
public class UserController {
static ConcurrentHashMap<Integer, User> users = new ConcurrentHashMap<Integer, User>();
/**
* 查询用户列表
* @return String
*/
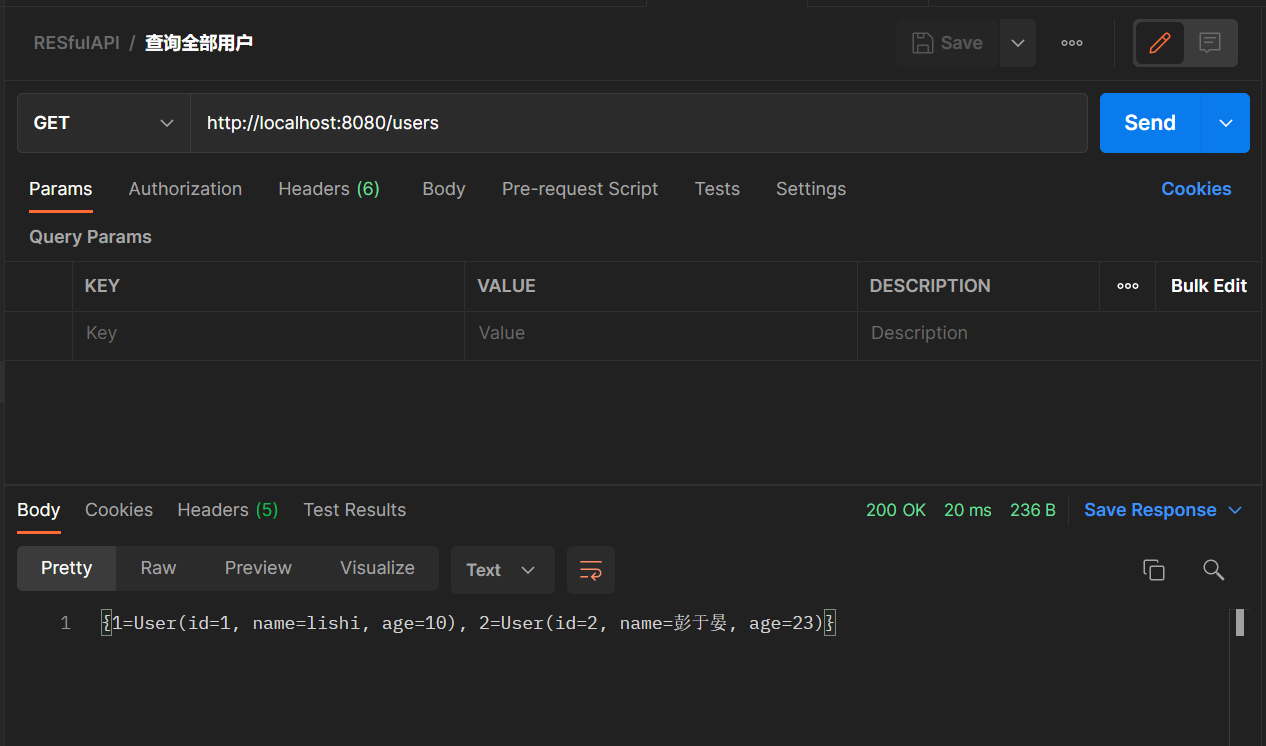
@GetMapping("/users")
public String getUsers(){
return users.toString();
}
/**
* 添加用户
* @param user 用户
* @return
*/
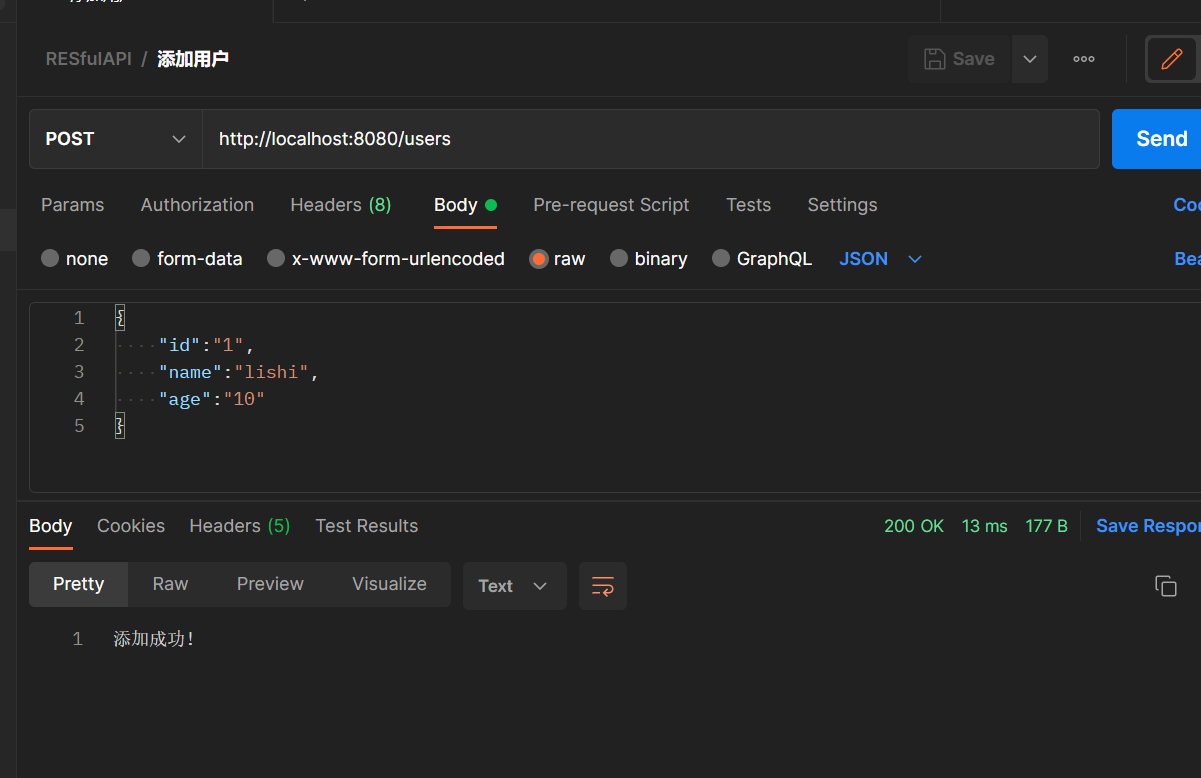
@PostMapping("/users")
public String addUser(@RequestBody User user){
users.put(user.getId(),user);
return "添加成功!";
}
/**
* 根据id查询用户信息
* @param id id
* @return
*/
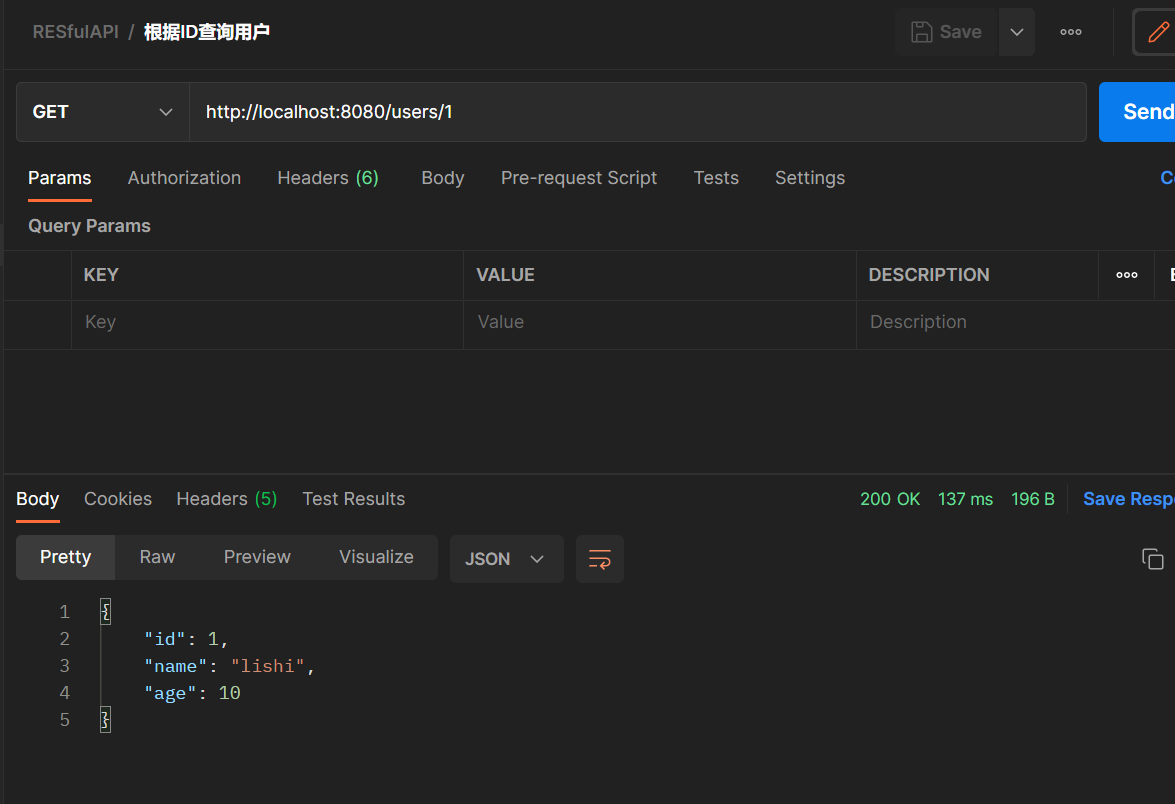
@GetMapping("/users/{id}")
public User getUser(@PathVariable("id") Integer id){
return users.get(id);
}
/**
* 根据id更新用户信息
* @param id id
* @param user 用户
* @return
*/
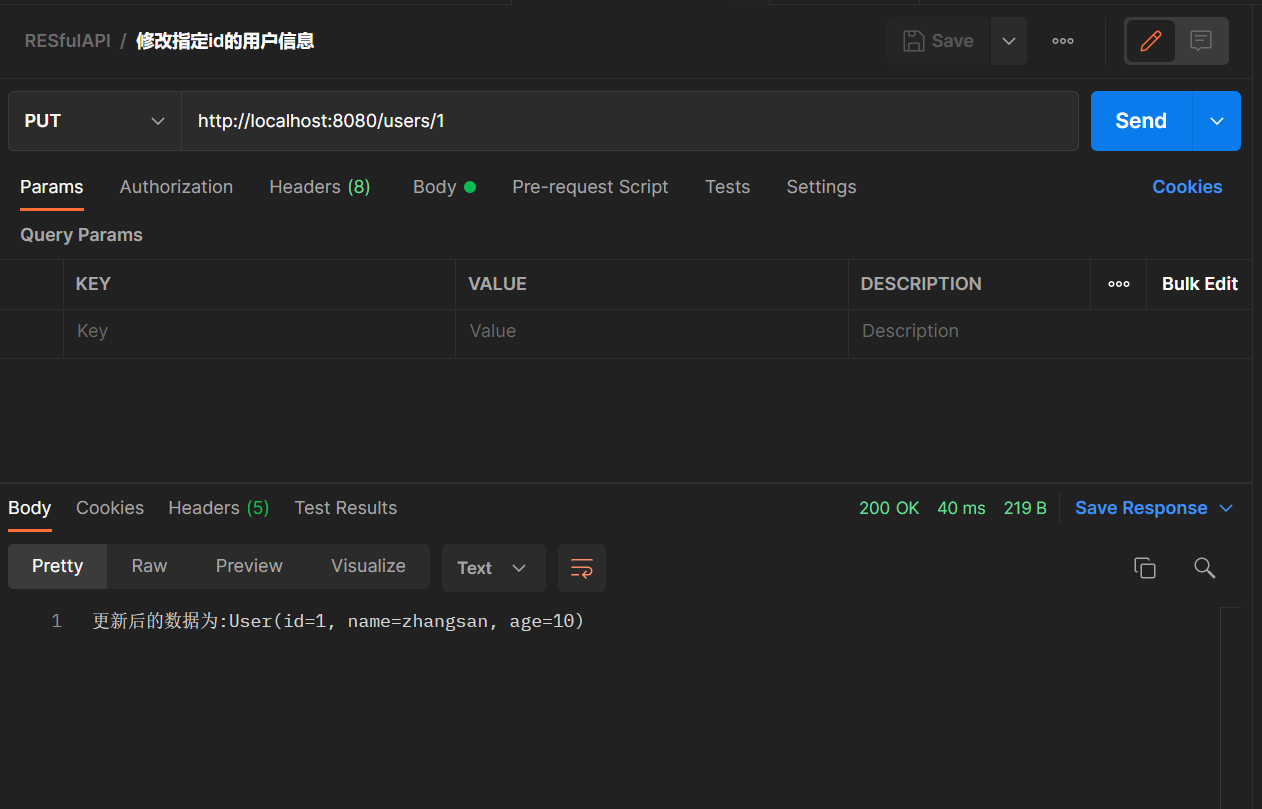
@PutMapping("/users/{id}")
public String putUser(@PathVariable("id") Integer id,@RequestBody User user){
users.put(id,user);
return "更新后的数据为:" + users.get(id);
}
/**
* 根据用户id删除用户信息
* @param id id
* @return
*/
@DeleteMapping("/users/{id}")
public String deleteUser(@PathVariable("id") Integer id){
users.remove(id);
return "成功移除id=" + id + "的用户数据";
}
}
接下来就是运行这个项目,在测试 RESTfulAPI 接口的可用性时,需要借助于一些第三方的接口测试工具。为了方便,可以使用在线接口测试工具 Getman ,你也可以使用自己熟悉的接口测试工具例如 Postman。我这里使用Postmain进行测试。

自定义SpringMVC配置
当在项目中引入 spring-boot-starter-web 依赖时,SpringBoot 便会自动配置 SpringMVC 相关的组件。但是有时候,默认的配置无法满足开发需求,这时就需要我们在 SpringBoot 中自定义 SpringMVC 配置。
自定义的几种方式
在SpringBoot中自定义SpringMVC的配置方式有两种:
- 在自动配置的基础上,进一步扩展
SpringMVC配置. - 使原有的
SpringMVC自动配置失效,自己重写该配置。
SpringMVC配置扩展
扩展
SpringMVC配置时需要自定义一个JavaConfig配置类,实现WebMvcConfigurer接口,根据实际需求重写该接口中的方法。
/**
 * 扩展MVC配置
 */
@Configuration
public class MvcConfig implements WebMvcConfigurer {
    /**
     * 添加资源映射
     */
    @Override
    public void addResourceHandlers(ResourceHandlerRegistry registry) {
        registry.addResourceHandler("/upload/**")
                .addResourceLocations("classpath:/upload/");
    }

    ...
 }
也许你在别的教程中看到过还可以通过继承抽象类 WebMvcConfigurerAdapter 类来扩展 SpringMVC 配置。在 Spring Boot 1.x 版本时, 确实采用的是这种方式,是因为当时用的 JDK 版本是 1.7 ,接口无法提供默认方法,WebMvcConfigurerAdapter 类其实也是通过实现 WebMvcConfigurer 接口提供了方法的默认实现。
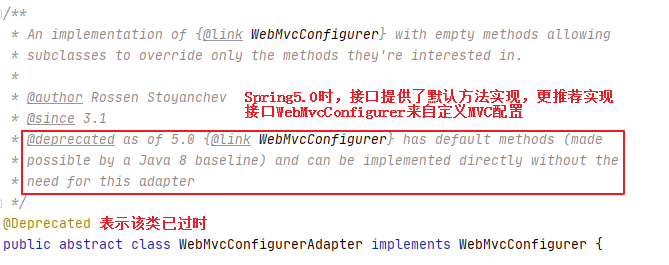
从上方的源码可以看到,在JDK1.8的时候由于接口也可以提供方法的默认实现,官方就不推荐继续使用WebMvcConfigurerAdapter 抽象类,而是推荐直接实现WebMvcCongifure来扩展WebMVC配置。
除了SpringMVC配置,也可以不使用SpringBoot提供的默认配置,像在SSM项目中一样,重写SpringMVC配置。
重写SpringMVC配置有两种方式:
-
继承
WebMvcConfigurationSupport类。 -
在配置类上加上
@EnableebMvc注解。
为什么当我们继承WebMvcConfigurationSupport之后会使SpringBoot的自动配置失效?
打开
Web的自动配置类WebAutoConfiguration的源码,类上的注解条件中有一条是若系统中不存在WebMvcConfigurationSupport.class类,自动配置才会生效。
@Configuration(proxyBeanMethods = false)
@ConditionalOnWebApplication(type = Type.SERVLET)
@ConditionalOnClass({ Servlet.class, DispatcherServlet.class, WebMvcConfigurer.class })
// 若系统中不存在WebMvcConfigurationSupport.class类,则该配置生效
@ConditionalOnMissingBean(WebMvcConfigurationSupport.class)
@AutoConfigureOrder(Ordered.HIGHEST_PRECEDENCE + 10)
@AutoConfigureAfter({ DispatcherServletAutoConfiguration.class, TaskExecutionAutoConfiguration.class,
                     ValidationAutoConfiguration.class })
public class WebMvcAutoConfiguration {
    ...
}
第二种方式中,虽然是通过的注解来达到相同的效果,但是底层的逻辑其实都是类似的处理。当使用该注解时,会帮我们导入一个 DelegatingWebMvcConfiguration.class 类,该类其实就是WebMvcConfigurationSupport.class 类的子类,所以这种方式也会使自动配置生效。
/**
 * @EnableWebMvc 注解导入的类,是WebMvcConfigurationSupport的子类
 */
@Retention(RetentionPolicy.RUNTIME)
@Target(ElementType.TYPE)
@Documented
// 导入一个配置类
@Import(DelegatingWebMvcConfiguration.class)
public @interface EnableWebMvc {
}

/**
 * @EnableWebMvc 注解导入的类,是WebMvcConfigurationSupport的子类
 */
@Configuration(proxyBeanMethods = false)
public class DelegatingWebMvcConfiguration extends WebMvcConfigurationSupport {
    // 提供父类方法的默认实现
}
案例演示
通过一个简单的小案例:实现
WebMvcConfigurer接口扩展扩展SpringMVC配置。
创建一个SpringBoot项目并添加Web启动器依赖。
接下来,自定义一个 JavaConfig 类,实现 WebMvcConfigurer 接口。
假设此时我们有三个需求:
- 假设程序中上传的图片都上传到了类路径下的 upload 文件夹,内部系统或者浏览器访问的时候,发送
/upload/**请求都需要到该文件夹下去读取图片。 - 当访问
/index路径时自动跳转到home.html页面。 - 当发送
/test请求时,添加一个拦截器,在请求执行前后和视图渲染后打印相关信息。
针对以上需求,我们可以通过下列方式解决:
- 针对第一个需求,由于静态资源只会去默认的四个静态资源文件夹下去查找,可以考虑添加一个资源处理器,当请求
/upload路径下的静态资源时自动去类路径下的/upload/文件夹下查找。 - 第二个需求,可以考虑添加一个视图控制器,当请求 URL 为
/index,自动跳转到home.html页面。 - 针对第三个需求,添加一个拦截器即可,实现它的前置处理,后置处理和最终处理即可。
在 src/main/java/com/example/config 目录下新建 ExtendMvcConfig.java 文件,实现 WebMvcConfigurer 接口。针对以上三个需求,重写 addResourceHandlers 、addViewControllers、addInterceptors 方法。
package com.example.config;

import org.springframework.context.annotation.Configuration;
import org.springframework.web.servlet.HandlerInterceptor;
import org.springframework.web.servlet.ModelAndView;
import org.springframework.web.servlet.config.annotation.InterceptorRegistry;
import org.springframework.web.servlet.config.annotation.ResourceHandlerRegistry;
import org.springframework.web.servlet.config.annotation.ViewControllerRegistry;
import org.springframework.web.servlet.config.annotation.WebMvcConfigurer;

import javax.servlet.http.HttpServletRequest;
import javax.servlet.http.HttpServletResponse;

/**
 * @author: 八尺妖剑
 * @date: 2022/4/11 15:15
 * @description: 自定义一个webmvc配置类
 * @blog:www.waer.ltd
 */
@SuppressWarnings({"all"})
@Configuration
public class ExtendMvcConfig implements WebMvcConfigurer {
    /**
     * 添加资源映射器
     * @param registry
     */
    @Override
    public void addResourceHandlers(ResourceHandlerRegistry registry) {
        registry.addResourceHandler("/upload/**")
                .addResourceLocations("classpath:/upload/");

    }

    /**
     * 添加视图控制器
     * @param registry
     */
    @Override
    public void addViewControllers(ViewControllerRegistry registry) {
        //浏览器发送/index请求来到home.html
        registry.addViewController("/index").setViewName("home.html");
    }

    /**
     * 添加拦截器
     * @param registry
     */
    @Override
    public void addInterceptors(InterceptorRegistry registry) {
        registry.addInterceptor(new MyInterceptor()).addPathPatterns("/test");
    }

    /**
     * 实现内部类,自定义拦截器
     */
    class MyInterceptor implements HandlerInterceptor{
        /**
         * 方法执行前调用
         * @param request
         * @param response
         * @param handler
         * @return
         * @throws Exception
         */
        @Override
        public boolean preHandle(HttpServletRequest request, HttpServletResponse response, Object handler) throws Exception {
            System.out.println("前置处理完成");
            return true;
        }

        /**
         * 方法执行后,视图渲染前
         * @param request
         * @param response
         * @param handler
         * @param modelAndView
         * @throws Exception
         */
        @Override
        public void postHandle(HttpServletRequest request, HttpServletResponse response, Object handler, ModelAndView modelAndView) throws Exception {
            System.out.println("后置处理完成");
        }

        /**
         * 视图渲染后,返回前
         * @param request
         * @param response
         * @param handler
         * @param ex
         * @throws Exception
         */
        @Override
        public void afterCompletion(HttpServletRequest request, HttpServletResponse response, Object handler, Exception ex) throws Exception {
            System.out.println("最终完成");
        }
    }
}
在 src\main\resources\ 目录下新建一个 upload 文件夹,在当前文件夹下放入一张图片来验证资源处理器是否配置成功。图片随意,下载完成后拖动到 upload 目录下。
在 src\main\resources\static 目录下新建一个 home.html 文件。
<!DOCTYPE html>
<html lang="en">
<head>
    <meta charset="UTF-8">
    <title>Title</title>
</head>
<body>
<h1>this is home</h1>
</body>
</html>
在 src/main/java/com/example/controller 目录下新建 TestController.java 文件,用于测试 /test 请求。
package com.example.controller;

import org.springframework.web.bind.annotation.RequestMapping;
import org.springframework.web.bind.annotation.RestController;

/**
 * @author: 八尺妖剑
 * @date: 2022/4/11 15:32
 * @description:
 * @blog:www.waer.ltd
 */
@RestController
@SuppressWarnings({"all"})
public class TestController {
    @RequestMapping(value= "/test")
    public String test() {
        System.out.println("test");
        return "success";
    }
}
最后,启动项目,再地址栏分别输入:
/upload/你的图片名称.图片后缀,是否能访问到图片。/index:是否能跳转到home.html并显示内容[this is home]/test:页面是否出现[success]且控制台是否显示打印信息。
SpringMVC配置重写
在
SpringBoot中,自动配置帮我们省去了大量繁琐的配置。一般情况下,如果想添加额外的配置还是更推荐去扩展配置。所以这里只是简单的介绍如何重写SpringMVC配置,暂时不作深入。
- 继承
WebMvcConfigurationSupport类。
/**
 * 重写MVC配置
 */
@Configuration
public class CustomMvcConfig extends WebMvcConfigurationSupport {
    ...
}
- 在配置类上添加
@EnableWebMvc注解。
/**
 * 重写MVC配置
 */
@EnableWebMvc
@Configuration
public class CustomMvcConfig  {
 ...
}
陆续更新中…